Optimization of your website is a top priority if you’re looking for organic traffic. Knowing about your traffic behavior and your web page performance is also important, isn’t it?
So, today as a responsible SEO Expert in India, I will be talking about Google Search Console, from very basic to advanced and step by step.
Many of you already know about Google webmaster tools and Webmaster Central, right?
Google webmaster tools are now Google Search Console!
So,
Why do we need Google Search Console (GSC)?
Well, this console helps webmasters to understand website performance in organic search.
You can add multiple websites in Search Console to track their performance and activities, simultaneously if you’re using Google Analytics, you don’t need to create a separate Gmail for Search console account or even have to verify the websites already added in Google Analytics (GA).
Let’s learn what are the other processes to verify your websites in GSC?
All right!
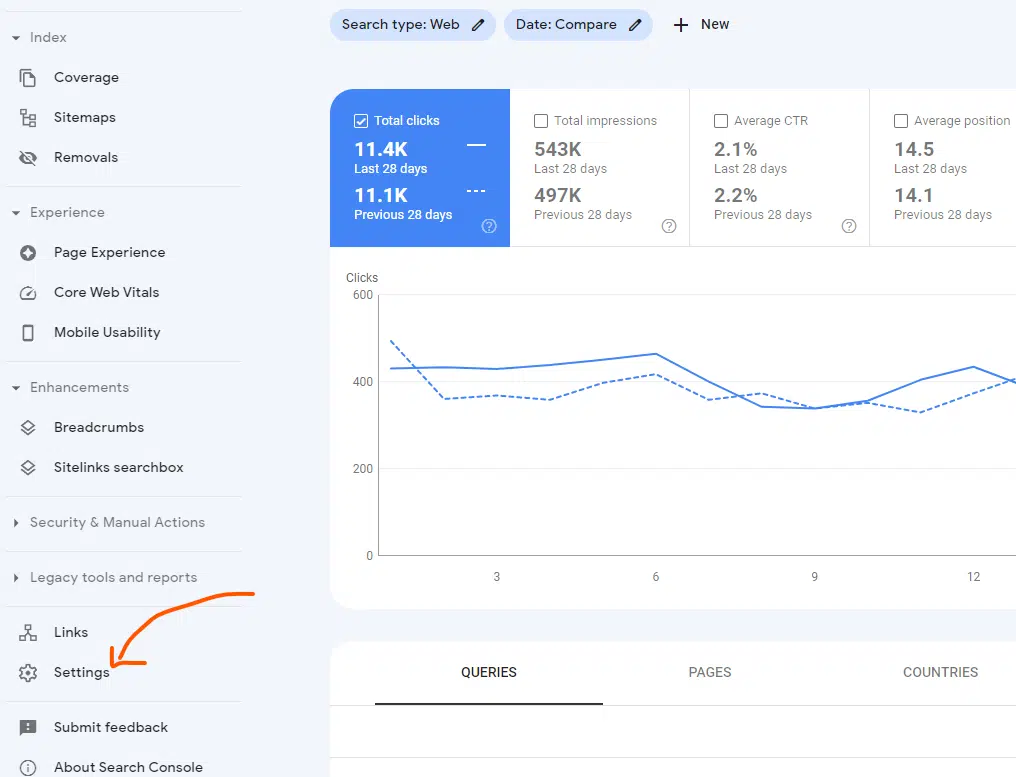
Once you logged in here> https://search.google.com/search-console/about Go to > Setting (On the downright side of the page)
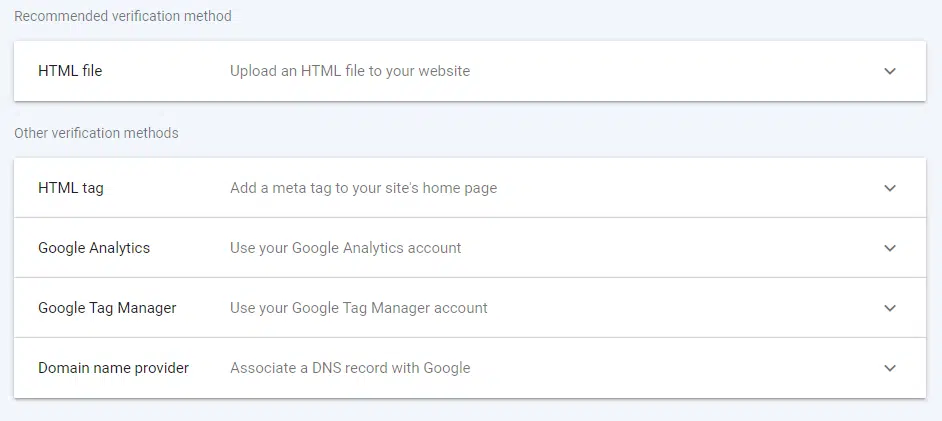
Here you have different methods to verify your website for the console.
NOTE: You can use multiple methods for verification.
Google Analytics (GA): If you’re already using the GA account, you just need to sign in via the same account for the search console. That’s it!
HTML File: This method is super simple. You just need to download the file given by Google from here and upload it to the main directory/path of your hosting. (Mostly in Public_HTML).
HTML Tag: This method is as simple as the previous one, you need to copy the HTML code and use it on your website, as per Google’s instructions,
Copy the Meta tag below, and paste it into your site’s home page. It should go in the <head> section, before the first <body> section.
Google Tag Manager: If you’re not aware of GTM, it’s time to learn about Google Tag Manager
To use GTM to verify your website, you should use a container snippet.
You can learn how to verify your website via GTM, from here
Domain Name Provider: In this process, you will need to verify your domain by adding a DNS record to your domain name provider. Check the image below
Once you verified your website with any of the given methods. Now it’s Google’s turn to crawl your website and check the performance.
It takes 48 to 72 hours in most cases to see some performance reports like traffic stats etc. For other reports, it can take more time so don’t bother.
Now, let’s start learning about other options and reporting to check your website performance. You can take a look at the right side of your page of the Search console. You will find options like:
Overview: Performance: URL Inspection
It shows the overall performance of your website in terms of the Number of Total clicks, Total Impressions, Average CTR (Click through Rate) & average position of your keywords:
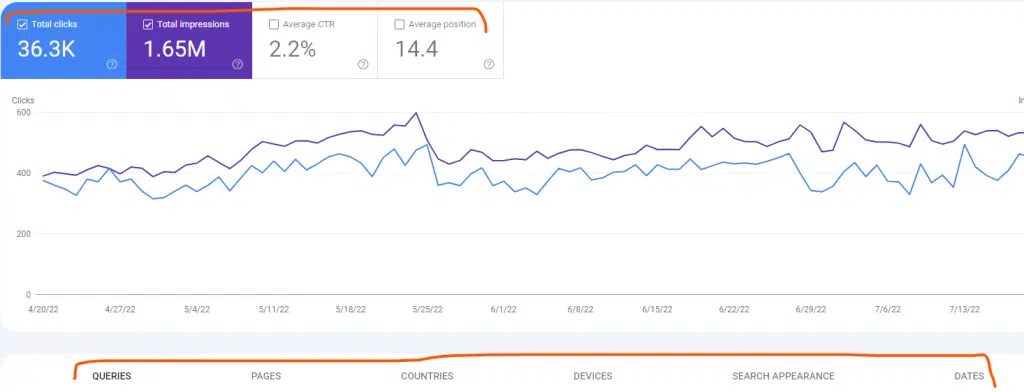
- A) Total Clicks: The total number of clicks a website got in the given time frame. You can click on the Date above the 4 Tabs (as you can see in the picture) and check or compare your stats within the time frame.
- B) Total Impression: Impression is directly related to your website discovery, i.e it is the number of times your website appeared in SERP (Search engine result page).
- C) Average CTR: Stands for Click-through rate. The total number of impressions divided by the total number of clicks is called CTR.
- D) Average Position: It is the average number of positions of your discovered keywords. Discovered keywords mean the terms that Google found on your website is appearing when someone searches them.
Now check out the image below,
I’m going to define all the terms written below in the image.
1) QUERIES – Queries are the terms your website discovered (appeared) in SERP when someone searches a related query. It can be your keywords directly that you’re targeting.
2) PAGES – Pages are the actual Page URLs of your website that were found by search engines associated with discovered keywords in the search console.
3) COUNTRIES – Country options show your clicks and performance based on countries worldwide.
4) DEVICES – This shows the device’s information that is used by users to find your website.
5) SEARCH APPEARANCE – This option shows how your website content is discoverable in SERP such as Web Light results, AMP non-rich results, and AMP articles.
6) DATES – This shows the discovered date.
URL INSPECTION
URL inspection allows you to inspect your website’s URLs (olden or new) if they’re ready to get indexed. Check out the image below.
If you have a new URL for your website, you can set an INDEX request. If the link is crawlable, it will be picked by Google. It can take from a few minutes to several hours to see your URL in SERP after doing an Index Request.

You can check your URL by going to> Google Search (Google.com) and then Type
site:yourwebsite.com/urlofthepage.php
This means you just need to type your URL after “site” (without double quotes) like above. Now Come to,
INDEX
COVERAGE
What is Indexing?
If you want to understand this in simple words when some sort of thing/object is taken into a group or register is commonly understood as Indexing, isn’t it?
Same with Google, if any web URL is crawlable that means Google’s BOT can check that URL and its entities then Google may want to include that URL in its SERP index depending on the information given on the page.
In the image given below, We’ve got errors (Coverage Issue – The Google Bot or crawlers were having a hard time reaching one of my pages.)
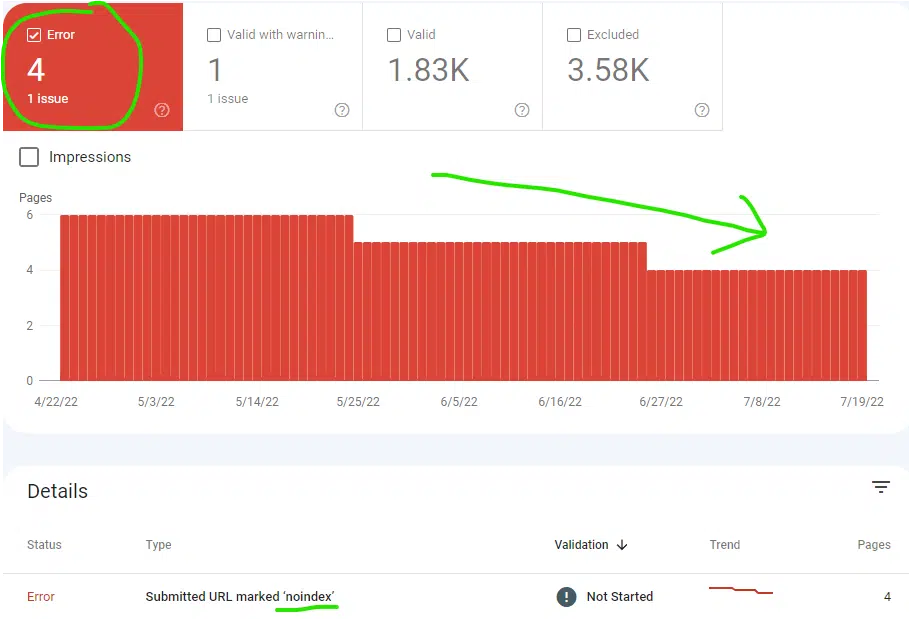
Now check out, what was the reason?
So, once We got the information, We fix it and process the page to Google to recheck the page.
In the above image, you can have multiple issues on your website, try out checking each of them and rectify them with the help of web developers (If you don’t understand these Tech Terms)
Once you fix your page, try to validate with Google as you can see, I did the same and it shows one validation has already passed and another has been started.
Google search can take a few hours to weeks to check and mark them fixed, so check your Coverage Issues time by time.
SITEMAP
A sitemap is your website’s map, a kind of architecture of your website which specifies the content path, depth, etc. to help understand Google crawlers (BOT) more easily about your site.
You need to create an.XML file with the help of developers (mostly for bigger sites) but if you just have a couple of hundred pages on your website, you can use any “SITEMAP generator online”.
Once you have your file ready, upload it to the main directory of your hosting, where you uploaded the HTML file for Google Search Console, right?
Once done, add the path here in the search console’s sitemap option.
In our case, we added something like sitemap.xml and submitted it.
In the case of the WordPress website, if you’re using any SEO plug-ins like RankMath & Yoast SEO, they have an in-built sitemap section. The plugin automatically creates a sitemap and updates it time by time once you add a new page on your website.
Isn’t that great about WordPress?
REMOVALS
GSC added the REMOVAL tool a few times ago, which means now you can request a URL removal from your console.
Which URL?
Well, the Website URL you think is previously indexed in Google and you don’t want them to have appeared in SERP.
It can be your outdated content! Or an Offer page URL which is already expired!
WARNING: Please read the complete details before you submit your removal request as it can impact your SERP appearance if not done properly.
EXPERIENCE
Page Experience:
According to Google:
A report that derives the information briefly about how your web visitor experiences while interacting with it. Every single URL of the website can have a different user experience.
Google calculates this report based on the following metrics:
Core Web Vitals
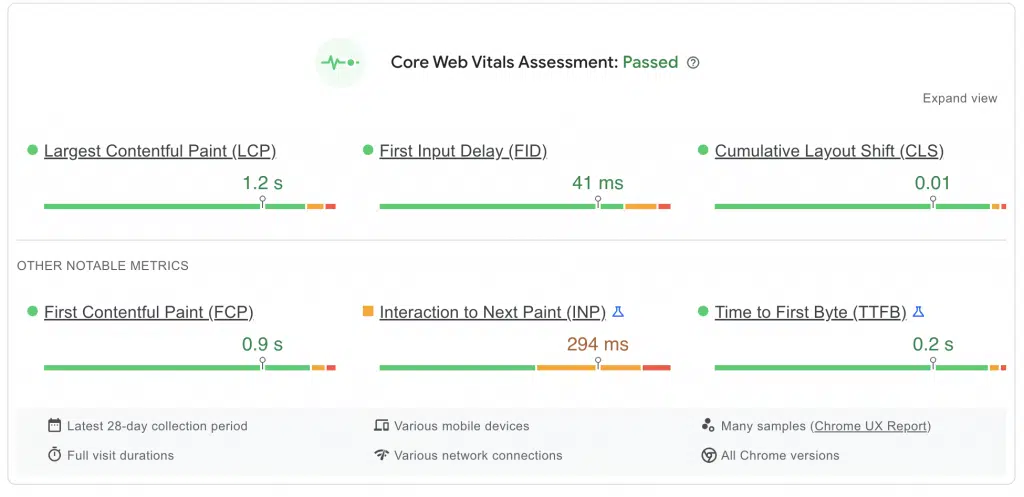
This is a super important metric that helps Google to test the speed, stability, and responsiveness of any individual page on the website.
I’ll share how to speed up your WordPress website/blog very soon.
Mobile Usability
As we discussed, GSC keeps adding major and minor tools in its GSC dashboard for the webmaster to understand and optimize.
Here Mobile Usability tool shows the valid URL (Pages) of your website which are mobile device optimized. When you get something that appeared in error, you can fix it by telling your web developer.
HTTPS
A page must serve all its elements via HTTPS status code so that communication between the browser and server entities should be safe.
This report lets you know about HTTP & HTTPS serving entities so that you fix them and improve your page experience.
Now, let’s talk about a few structured data markups that help us to enhance our web pages.
ENHANCEMENTS
This allows you to add more enhancements to your website to increase engagement, ranking, and most important, user experience.
There are large things that can be done as your enhancement activity such as
SITELINK SEARCH BOX
Sitelink search box is now available in GSC. This is nothing but a schema that features a search bar of your website or app on the search engine result page. In this section, you can check the relevant report.
BREADCRUMBS
According to Google,
Google Search uses breadcrumb markup in the body of a web page to categorize the information from the page in search results, read it here
FAQ
Frequently Asked Question is a FAQ structure data markup type that helps your FAQ page to have appeared in SERP with personalized business-related questions and answers.
Some others such as Review Snippets, and Sitelinks Search Box are good examples of Enhancement.
SECURITY & MANUAL ACTIONS
As the name indicates, Google is much more cautious when it comes to user experience. If you have any dangerous codes somehow managed to be placed by hackers on your website to trick users in possible ways, google identifies it and shows a report.
Google also can act by demoting or removing website pages or even the complete website from SERPs. These are Google manual ways to punish websites for spammy behavior.
You can check the Security & Manual action report time by time and make sure to prevent your website from web spamming including a hack attempt.
LEGACY TOOLS & REPORT
INTERNATIONAL TARGETING
You can use this to target your audience more accurately and specifically based on location and language.
You can set “hreflang” tags to specify the language of your website, you can check this post by Moz
Also, you can set your target country if the domain doesn’t specify it.
What does it mean?
Well, see if you have the country-specific domain extension such as website.com.au or website.co.in, etc. you don’t need to set your country in Google Search Console.
CRAWL STATS REPORT
As previously discussed, crawling is the process to discover entities such as CSS, Flash, PDF files, Javascript codes, etc on your website.
Now,
This report gives you information about Googlebot’s crawl activities on your website in the last 90 days. You can check how the crawl stats report works for more information.
MESSAGE
This is a message panel where you receive messages & updates related to issues, bugs, fixes, etc.
For each domain, you get a separate message panel.
You can also get information updates and issues for all the domains associated with your GSC account in your GSC email (the email you use to log in to your Google search console account).
URL PARAMETERS
If you’re using any parameters in your website URLs, you must indicate the handling process so that GoogleBot crawls your site properly and efficiently.
You can read about URL Parameters information given by Google.
WEB TOOLS
These are the additional tools available for webmasters such as
a) Ad Experience Report:
This applies to Google Ads,
As per Google,
“The Ad Experience Report is designed to identify ad experiences that violate the Better Ads Standards, a set of ad experiences the industry has identified as being highly annoying to users. Check the “Desktop” and “Mobile” links to the left to see if your site violates the Better Ads Standards. If violations have been identified, you can request a review of your site after you’ve fixed the issues.“
That’s a very clear overview of the report given by GSC.
b) Abusive Experiences:
You can select a property to check the abusive experience status of your websites (here selecting a property means selecting a website).
So,
When a property status can be an abusive experience? Check out the information right here.
c) Testing Tools:
Now you have some great tools to structure and decorate your search results. such as
Structured Data Testing tools: Once you added the markup code to your website, you can test the code and check out if you have done it correctly
Structured Data Markup Helper: You can use this tool to add structured data markup by tagging entities and adding the code to the HTML code of your website. We will create a separate post for the whole Structure Data Markup Helper
Email Markup Tester: You can also validate your structure data content of an HTML using this markup tester.
d) Other Resources:
You can check out other resources such as Google my business, webmaster academy, etc. for more information or log in directly from here.
LINKS
This is the link report section and can be used to check External, Internal links along with the Top linking site & text.
a) External Links: The links coming from websites to your website are called external links, it is commonly known as Backlinks as well.
b) Internal Links: The links (URLs) linked to other URLs within your website can be counted as internal links.
For example, a service page content has a link to the home page.
c) Top Linking Sites: The topmost external sites which are linked to your website.
d) Top Linking Text: The text is also known as “Anchor Text” in general. So, the top text used as a hyperlink to link back to your webpage or website is called top linking text.
These are commonly used tools and terms in the Google search console.
I tried to collect some of the most appropriate information about GSC available online but if you have any doubts or any suggestions, please let me know in the comment section. Also, share this tutorial if you love the information and want to appreciate it.


